
Needle Threader Guide: Threading a needle comes down to aim. The eye is small, the thread end frays and your hands aren’t always steady. A threader acts like a guide, holding the eye open and pulling the thread through for you.
The benefits go beyond comfort. You waste less thread from snipping off frayed ends, you sew faster and you can thread needles that are difficult to see, like fine embroidery needles. People with reduced vision or arthritis in the fingers often find a threader makes sewing possible again.
What tends to surprise newcomers is how quickly it pays off. The first time you thread a fine needle in two seconds, it feels like a small superpower.
The Main Types of Needle Threader
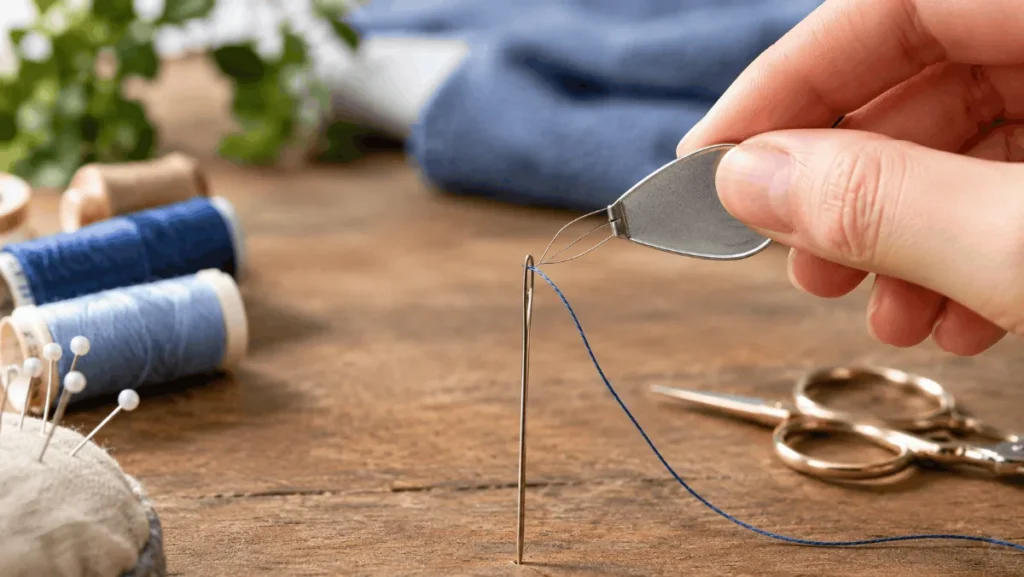
The classic version is the wire loop threader: a thin, diamond-shaped wire attached to a small handle, usually metal or plastic. It’s the one most sewing kits include. You push the wire loop through the needle’s eye, thread the loop, then pull it back, bringing the thread through.
A desktop or stand threader holds the needle in place, which helps if you struggle to hold both pieces at once. Some have a small magnifier and a hook that guides the thread automatically when you press a lever.
Automatic or push-button versions are built into many sewing machines. They use a tiny hook to pull the thread through the needle eye with a single lever. If your machine has one, it’s worth learning, though it can be fussy with certain needle sizes and thread types.
Specialty threaders include devices for hand-sewing needles with very small eyes, for serger or overlock machines and for threading beads or large-eye needles used in tapestry and quilting. The idea is the same in every case, but the dimensions differ.
Choosing the Right One
Match the tool to the needle. Wire loop threaders come in different sizes, and a loop that’s too thick won’t fit through a fine needle eye. Many packs include a couple of sizes. For general sewing, a standard size is fine, while very fine needles call for a fine-wire version.
Look at the wire. Thin, flexible wire gets through small eyes, but it also bends or breaks more easily. Stainless steel lasts longer than the cheapest wire. A comfortable handle makes a big difference, especially if you thread dozens of needles in a session.
If you have limited vision, a desktop model with a built-in light or magnifier can be worth the extra cost. If you quilt or embroider, buy a few spares. They’re small and cheap, and they tend to disappear.
Prices vary, and quality does too. Cheap threaders work, but flimsy wire breaks fast, so check reviews and buy from a sewing-supply store or a reputable seller.
How to Use a Wire Loop Needle Threader
This is the one most people have, and the technique is simple once you know the trick.
- Cut the end of your thread cleanly with sharp scissors so it doesn’t fray.
- Push the wire loop through the needle’s eye, from the front toward the back.
- Pass the thread end through the wire loop, leaving a short tail.
- Pull the wire loop back out through the eye, bringing the thread with it.
- Slide the thread off the loop and pull a tail through the needle.
If the thread slips out, use a slightly longer tail and pinch the loop gently as you pull. Dampening the thread end isn’t necessary for most threaders, though some people lightly wet it for stubborn cotton.
In my experience, the biggest improvement comes from a steady hand position. Rest your elbows on a table and bring the needle to your hand rather than reaching.
Using a Desktop or Automatic Threader
Desktop models usually clamp or rest the needle in a small slot. You place the thread in the guide, press a button or lever, and the hook carries the thread through. Check the manual for the right needle sizes, since some models only handle a certain range.
Machine threaders follow a short path: raise the needle, set the thread in the guide, lower the lever and let the hook swing through the eye. If it doesn’t catch, make sure the needle is fully raised and correctly installed, and that the thread is seated in the tension discs.
One thing worth flagging is that bent needles ruin automatic threading. A needle that’s slightly bent won’t line up with the hook, so replace it often.
Troubleshooting Common Problems
The wire won’t go through the eye. The loop is too thick or the needle’s eye is too small. Try a thinner threader or a larger needle.
The thread keeps slipping out. Cut a fresh, clean end and leave a longer tail. Thread that’s frayed or thick for the eye is a common culprit. Switching to a thread that suits the needle size makes a big difference. Sewing resources like the Wikipedia page on sewing needles explain how needle sizes and eye shapes vary.
The wire bends or breaks. Don’t force it. Use a gentle push, and replace the threader when the loop is damaged. A bent loop can also snag the thread.
The thread tangles in the loop. Pull straight back instead of twisting. If the loop catches, release the thread and start again.
Needle Threader vs. Other Tricks
Some people use a loop of fine fishing line, a folded piece of paper or a bit of dental floss as a makeshift threader. These work in a pinch, but they’re less reliable than a proper tool.
Another trick is to use a needle with a bigger eye, such as an embroidery or chenille needle, when the fabric allows it. Self-threading needles with a slot in the eye let you pop the thread in sideways, which is great for hand sewing, though the slot can occasionally snag delicate fabrics.
My lean is to keep a basic wire threader in every kit, since they cost almost nothing, and to add a desktop model if vision or dexterity is an issue.
Care and Storage
Keep your threaders in a small case or pinned to a pincushion so the wire doesn’t bend. Wipe off thread residue with a cloth if lint builds up. Replace them when the wire is kinked or the handle loosens.
Store them away from moisture, because rust can weaken the wire and stain fabric. Good sewing habits include keeping needles and tools in a container with a lid, especially around children and pets.
Safety Basics
Threaders themselves are fairly harmless, but the needles they work with aren’t. Always keep sharp needles in a container and don’t leave them loose on a couch or table. If you sew with children, supervise closely.
If you notice persistent hand pain, numbness or trouble with fine motor tasks that make sewing hard, mention it to a doctor. Tools like threaders can help, but they don’t replace medical advice.
Who Should Buy One
Almost everyone who sews by hand benefits from a threader, and you’ll appreciate it most if you do detailed work like embroidery or mending fine fabrics. It’s also a great gift for older relatives who love to sew but find threading frustrating.
You can skip it if you have excellent vision and mostly use large-eye needles. For everyone else, it’s a few dollars well spent.